How to Make DIY Makeup Remover Wipes from Upcycled Fabric (with photos!)
- Emma Dendler

- Jan 26, 2021
- 3 min read
Yes, there are a lot of places to buy brand new reusable makeup wipes, and that is great, support small business if you can/want! But, what about that old fabric you might have lying around, or that tshirt that can't be donated? This is a free makeup remover wipe option and I hope you enjoy it!
Supporting small, eco-businesses is great, but admittedly sometimes expensive. This is the budget option for reusable makeup remover wipes. Not to mention, the most sustainable thing is the thing you already own (like an old pillow case), so why not turn it into something useful!
I made my first batch of reusable makeup remover pads over two years ago. They work well, but they were too small and too flimsy. I'll still use them for sure, but I wanted a higher quality option. So, I edited the pattern, added more fabric, and ta-da! Easy DIY makeup remover wipes made from waste and helping me prevent more waste.
I hope you enjoy this tutorial! Let me know down below if you have any questions or suggestions. Stay tuned on my Instagram for a video tutorial!

All you need is:
- A sewing machine
- Old fabric (it's best to upcycle something you already have vs buying brand new! Tshirts are great but I used a pillow case in this makeup remover wipe tutorial)
- Thread
- Scissors (fabric scissors work best)
- A ruler or flat edge to draw lines
- Fabric chalk
Here's how to make DIY makeup remover wipes:
1. Find some suitable fabric (cotton or other natural materials work best, but polyester is fine, too). I used a Tshirt a while back, but in this tutorial, I'm using a pillow case.
2. Lay your fabric on a flat surface and make sure it's as wrinkle-free as possible. I like to double up on the fabric to make the makeup remover pads easier to handle. This can be using two shirts or just folding the shirt in half to make it thicker.
3. Measure the size of your makeup remover pads: here, I did about 8 cm (roughly 2.5-3 inches) per pad. BUT, don't forget to leave room to cut them out later (this prevents you from sewing 30+ individual pads). The measurements are: 8 cm, 1 cm, 8 cm, 1 cm, repeat until the end. Then flip the fabric 90 degrees to make the same pattern the other way to form crosshairs. It will look something like this:

4. Pin your fabric along the edges so it doesn't move around and you are sure to sew the front to the back.
5. Sew along the edges first so you can ditch the pins and have a sturdy work surface.
6. Now, it's time to sew along all the lines! It's a bit tedious, but a rather quick process.
* TIP: be sure to double back on all the crosshairs so that they don't come unravelled when you cut them! That will look something like this:
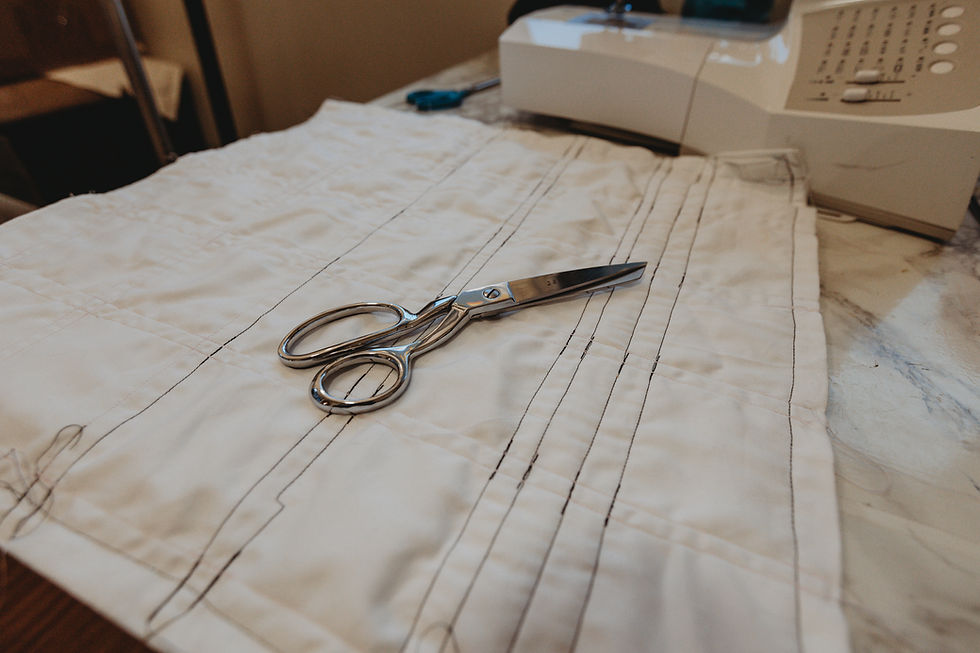
7. Once you have completed every single row, it's time to cut! Using sharp fabric scissors works best. Cut in between the 1cm lines leaving an edge on both pads. It will look like this:

8. Continue to cut in between the 1cm lines to leave singular pads. Trim any strings if necessary. Here is the final result!

That's it! I store them under the sink in my bathroom for easy access. They are machine washable, too. I keep them in a mesh garment bag so that they don't get lost within my washer or dryer. But, they can easily be hand-washed, too.
I hope you enjoyed this easy tutorial for makeup remover wipes! Let me know if you tried this down below and if you have any tips or pointers for making them better. Happy upcycling!
Remember that the small changes you make have a big impact in the long run :)
Emma


Comments